Configuring a SAML Domain with an ADFS Identity Provider
Entrinsik does not support identity providers. This article helps you configure the second most common identity provider, Microsoft ADFS. It should not replace the official Microsoft SAML 2.0 provider with ADFS documentation or your internal procedures.
Configure a SAML Domain within Informer
The first step in configuring this trust relationship is to build the base of the Service Provider (Informer) side and then export the SAML metadata for ingestion into the ADFS Relying Party Trust configuration screen. Follow the documented steps for Configuring a SAML Domain within Informer. Other than the Identity Provider Cert, which comes later, all fields within the Informer SAML Domain Connect screen are required.
Once this is complete, follow the guidance in that article on pulling an XML file with the Informer Service Provider metadata. A Shibboleth-compatible metadata XML is found at the following URL path:
/api/login/<saml domain id>/metadata
The <saml domain id> is a slugified version of the SAML Domain name. You can find this value by selecting the i info icon for the recently created Domain.
If the chosen name for the SAML Domain was Informer 5 and the DNS for Informer was also informer5, the full path to pull the SAML metadata would be:
https://informer5/api/login/informer5/metadata
Take the downloaded XML file and move it to a server with access to the ADFS console.
Tip: The ADFS entry point is the same for all applications. The URL structure is https://<ADFS-FQDN>/adfs/ls/. Replace <ADFS-FQDN> with the relevant ADFS server.
Add a Relying Party Trust to ADFS
Open the ADFS console. Right-click Relying Party Trusts and choose Add Relying Party Trust. Keep defaults for anything not specified, or follow your internal policies. When prompted, choose a claims-aware trust. On the optional import screen, choose to import an XML file via a file upload; do not choose the XML URL method, which has subpar results.
After importing the XML metadata, apply a logical display name to the trust, such as "Informer 5."
For the purposes of this article on user access, assume that all users may access Informer or that limiting user access rights is handled elsewhere (Permit Everyone / Grant Access to everyone). Always follow your internal policies and procedures. Save the configuration.
Configure ADFS rules to send LDAP attributes as SAML claims
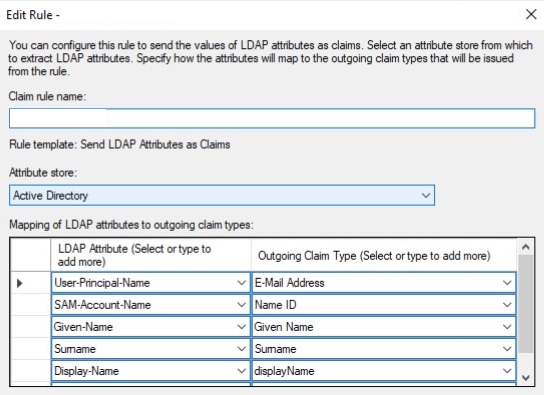
Find the newly saved trust in the ADFS console and add a new claim rule. Set a rule name on the resulting configuration page, such as "Informer 5."
It is suggested to configure LDAP attributes to outgoing claims, taking special consideration for the Name ID claim, which becomes the username value within Informer. Standard attribute options are SAM-Account-Name, User-Principal-Name, and E-Mail Address. Choose the option to be used as the username within Informer.
Identity Provider certificate
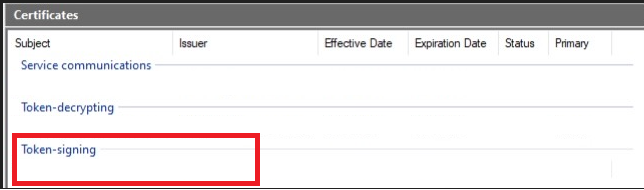
Within the ADFS console, find the certificates section and export a copy of the Token-signing certificate.
Edit the exported certificate with a text editor, then copy the certificate text body. This full string goes into the Informer SAML Domain configuration screen under the Identity Provider Cert field.
Completing the trust relationship
Navigate back to Informer with the ADFS Token-signing certificate in the paste buffer. Edit the SAML Domain to open the configuration screen and paste the certificate body into the last unconfigured field, Identity Provider Cert. With this in place, the trust relationship configuration is complete. There is one more step: configuring the Domain attributes sent as claim rules from ADFS (IdP) to Informer (SP).
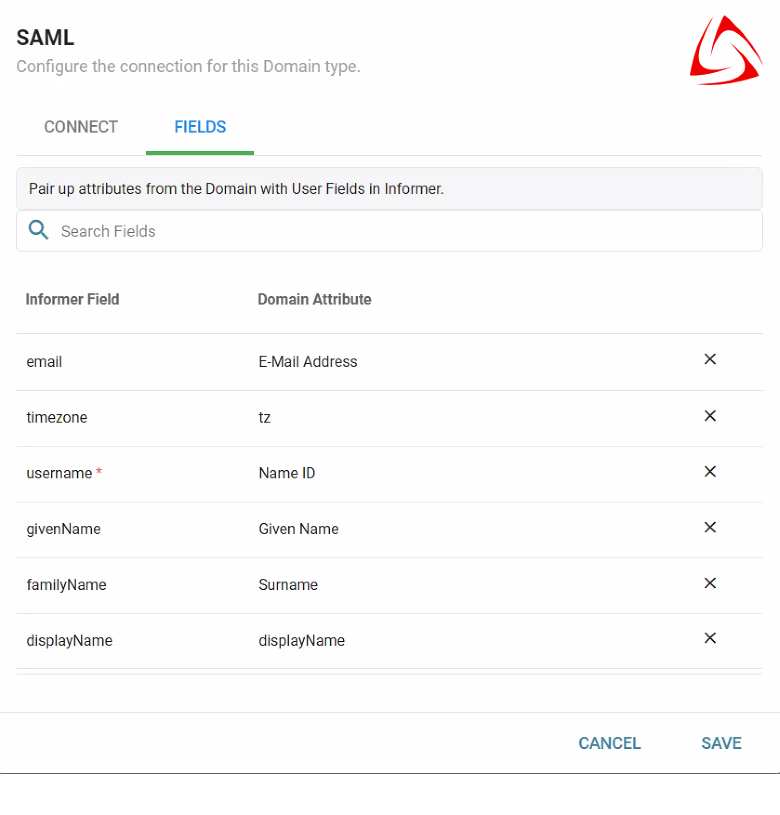
From the Informer SAML configuration screen, navigate to the Fields tab. Configure the Domain Attribute values to match the claim rules you set in ADFS, then click Save. Note that values are case- and space-sensitive. After this, you are ready to test SAML integration with Informer.