Configuring a SAML Domain
SAML is a protocol supporting single sign-on between identity providers (IdPs) and service providers (SPs). Informer behaves as an SP and needs to establish a trust relationship between itself and at least one IdP for SAML to function. Informer does this by exchanging certificates with the IdP and establishing the parameters of their communication. Different IdPs have different methods for establishing this trust relationship on their end, so this document cannot cover that process.
Adding a SAML Domain
Informer requires the following items to set up a SAML Domain:
- An X509 certificate in PEM format for the Informer server
- A corresponding private key paired with that certificate
- The X509 certificate in PEM format for the IdP
- The entrypoint URL for the IdP (the address Informer will send its requests to)
After obtaining the necessary information, go to the Administration page and click the Domains icon in the navigation panel. Click the New Domain button, then select SAML. This opens a panel with configuration options for the SAML Domain.
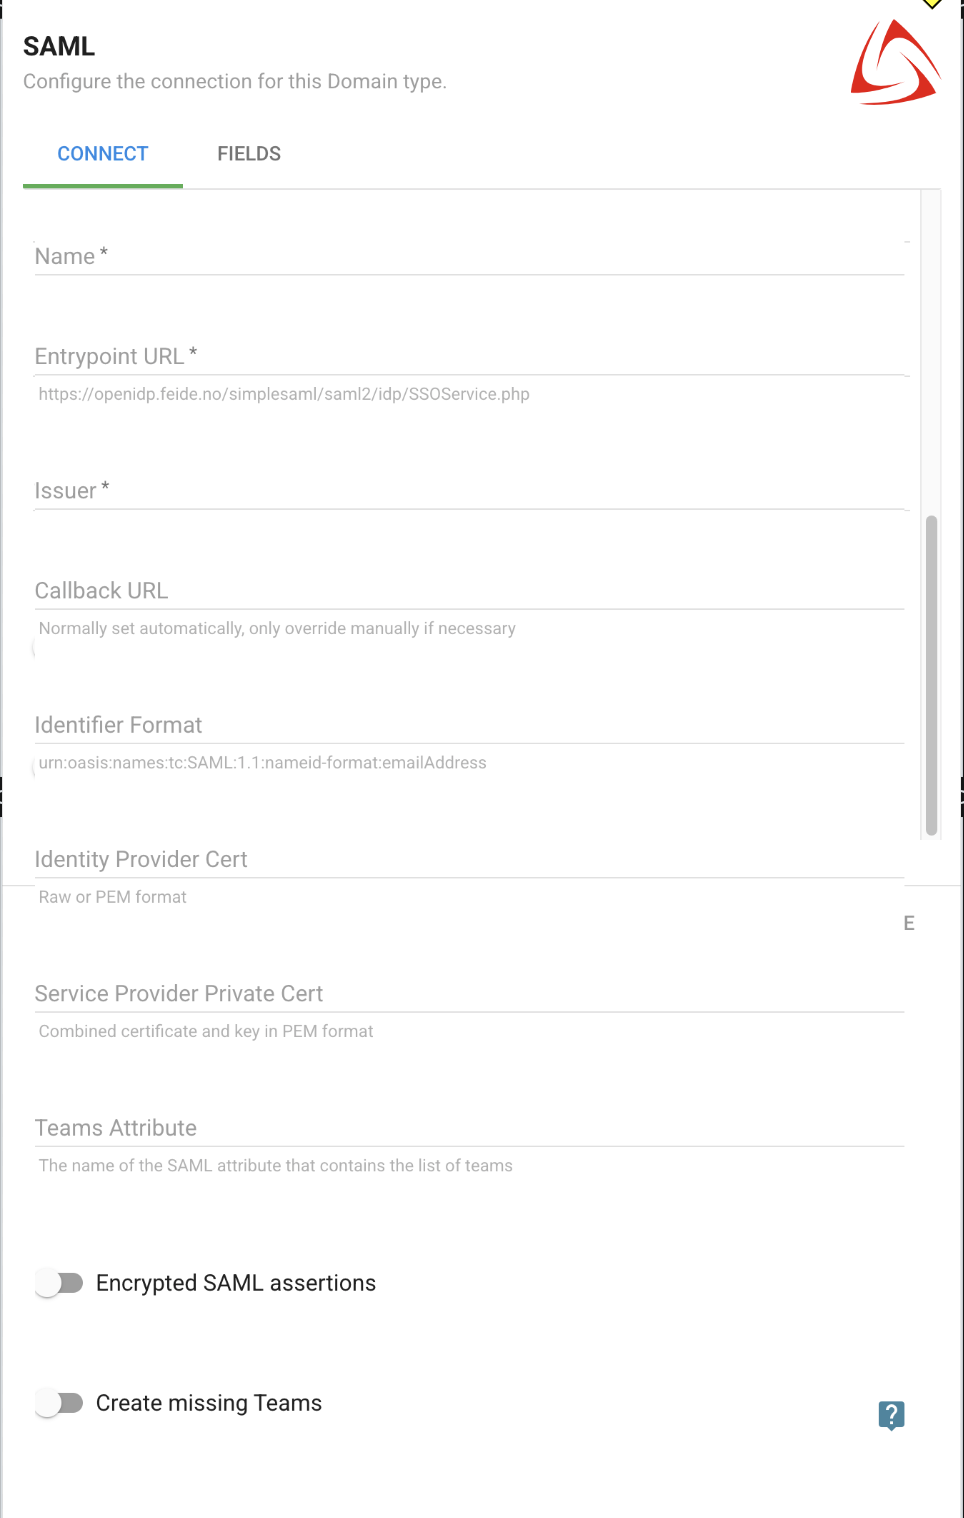
- Name: The name of the Domain. This does not need to match anything at the IdP. It identifies the Domain on the login screen and on the list of Domains under the Administration page.
- Entrypoint URL: The URL where Informer tries to POST its SAML requests. Informer expects the IdP to redirect the user back to Informer with a SAML response.
- Issuer: Also known as the EntityID. This is the ID that Informer sends its SAML requests to the IdP with. The IdP needs this to establish a trust relationship with Informer.
- Callback URL: The Informer route the IdP needs to redirect the login request to after user authentication. The Callback URL is generated automatically upon saving the SAML Domain configuration. Its syntax is
https://<URLtoInformer>/api/login/<DomainID>?redirect=true. - Identifier Format: The ID format the returned User's ID will take. The default is
urn:oasis:names:tc:SAML:1.1:nameid-format:emailAddress, which requests the User ID to come back as an email address. - Identity Provider Cert: The string of the IdP's server certificate in X509 PEM format.
- Service Provider Private Cert: A combined, PEM-formatted certificate and private key in a single string for the Informer SP. The IdP likely needs this certificate shared with it to establish its trust relationship with Informer. There are various tools to create a certificate and corresponding unencrypted key; an example using OpenSSL is below.
- Teams Attribute: The SAML attribute that contains the array of Teams the User belongs to.
- Encrypted SAML assertions: A toggle indicating whether the IdP will encrypt the assertions it sends in its SAML responses with its private key.
- Create missing Teams: When enabled, creates new Teams in Informer for any values found in the Teams Attribute that do not already exist.
Post-creation notes
The Callback URL after the initial save generates automatically. The URL portion pulls the configured Host value from the Informer config.json file in the root install directory. This configured value is not always the same as the DNS used to access Informer and may need to be corrected after the initial save. The Callback URL must match the DNS to Informer. To change it, double-click the SAML Domain to open the editor and alter the URL portion of the Callback URL to match the DNS of Informer.
The Callback URL is also available as a read-only value when selecting the SAML Domain from the Domain list, in the right-hand Information pane.
Note: Some screen resolutions may truncate this URL. Selecting it with a double or triple click should still select the entire URL.
A Shibboleth-compatible metadata XML is available at the following URL path after creating the Domain:
/api/login/<saml domain id>/metadata
Service Provider certificate and key
When adding a SAML Domain, the Service Provider and Identity Provider must exchange certificates. To complete this exchange, a Service Provider certificate is required. There is no requirement to use OpenSSL for this process; however, OpenSSL ships with Informer deployments hosted on Windows and is a convenient option.
Informer is compatible with an X509 certificate and a corresponding unencrypted RSA key.
The steps to create and combine a certificate and key are below. Skip these steps if a certificate and unencrypted key are already on hand.
How to create an X509 certificate with an unencrypted RSA key
Launch an elevated PowerShell window from a computer with OpenSSL and execute the following:
openssl req -newkey rsa:2048 -nodes -keyout key.pem -x509 -days 365 -out cert.pem
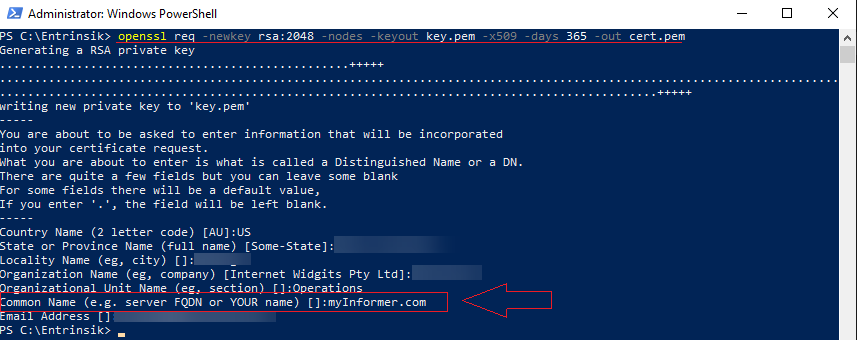
After running the command, fill out the prompts relative to your organization. Note the common name: this is the DNS to the Informer server.
Adding a combined certificate and key to an Informer SAML Domain
Following the steps above, the individual files are named cert.pem and key.pem. Open both files in a text editor and combine their text into a single string: the full certificate block (-----BEGIN CERTIFICATE----- through -----END CERTIFICATE-----) followed by the full private key block (-----BEGIN PRIVATE KEY----- through -----END PRIVATE KEY-----).
Copy the entire combined string, omitting any extra whitespace, and paste it into the Informer SAML Domain under the Service Provider Cert field. Save the update; note that the certificate and key are stored encrypted.
