Installing Informer (Windows)
The native installer is the preferred way to install Informer on a supported Windows Server. It is a single offline executable that contains everything Informer needs, and it walks you through installing each component (Java, PostgreSQL, Elasticsearch, Redis) in turn. Read Read me first before you begin, and read through this guide once before starting so the key decision points are familiar.
We strongly recommend running the installation as the local Administrator account, or an Informer service account with administrative rights. Using the same account for installs and future upgrades keeps permissions consistent.
Download the installer
The full offline installer is roughly 1.4 GB. This example links version 2025.2.13; contact Informer Support for the current installer:
Informer 5 Offline Installer (2025.2.13)
You can download it directly onto the Informer server, or copy it over from another computer.
Install time on Windows is significantly affected by anti-virus software, which scans each file as it lands. This can turn a 20-to-30-minute installation into upwards of 2 hours.
Run the installer
Right-click the installer and choose Run as administrator.

Click Next to reach the list of components to install:
- For a new install on a brand-new server, choose Install from the drop-down. This automatically checks every component needed for a clean installation.
- To pick components yourself, choose Custom.
If PostgreSQL, Elasticsearch, or Redis will run on different servers, you can uncheck those components. They must already be installed and reachable before you install Informer, or Informer will be unable to start.
Click Next. You are asked where to install Informer. The default is C:\Entrinsik. You can choose any available drive and directory; Informer is installed into a sub-directory named Informer5 (for example, C:\Entrinsik\Informer5). The folder must be named Informer5.
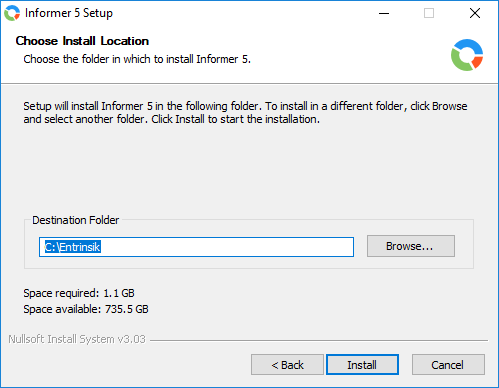
Click Install to begin. The installer launches each component's own installer (Java, PostgreSQL, Elasticsearch, and so on). The defaults are recommended, but you can adjust them for your environment.
- During the PostgreSQL install, you set a password for the
postgresuser. Note it down: you need it later in the Informer setup. - At the end of the OpenSSL install, you may be asked to make a donation to the developer. It is not required; you can uncheck the box and continue.
Answer the setup prompts
After the Informer files are extracted, the configuration is initialized and you are prompted for details about this instance. To accept the default shown for a prompt, press ENTER without typing anything.
Instance and connection prompts
| Prompt | Default | What to enter |
|---|---|---|
| What do you want to call this instance? | Informer5 | A name for this instance. |
| What hostname would you like Informer to bind to? | none | The server URL as you would type it in a browser, without http:// or https:// (for example, informer5.entrinsik.com). This address must be used to reach Informer over HTTPS, or you get an ECONNREFUSED error. |
| What do you want to call this instance's database? | instance name | The Informer database created in PostgreSQL. It holds Informer's system information: Datasource settings, Mappings, Dataset definitions, and so on. |
| What do you want to use for this instance's token secret? | none | A passphrase that encrypts all of Informer's assertions (session tokens, Datasource passwords, and so on). Must be at least 32 characters long. |
| What is the name of your Postgres server? | localhost | The server where Postgres runs. |
| What port is your Postgres server listening on? | 5432 | The Postgres port. |
| What Postgres user should Informer log in as? | postgres | The Postgres login user. |
| What is that Postgres user's password? | none | The password for that user. For postgres, this is the password you created during the PostgreSQL install. |
| What is the hostname of your Elasticsearch server? | localhost | The server where Elasticsearch runs. |
| What port is your Elasticsearch server listening on? | 9200 | The Elasticsearch port. |
| What version is your Elasticsearch server? | as shown | Your Elasticsearch major version, or accept the shown default. |
| What is the hostname of your Redis server? | localhost | The server where Redis runs. |
| What port is your Redis server listening on? | 6379 | The Redis port. |
| HTTP Port | 80 | The non-secure port Informer binds to. It must not be in use by another application (such as Apache or IIS) on the API server. If you plan to use HTTPS, do not enter the secure port here; you are asked for it later. |
If you enable HTTPS/TLS
At the Include support for HTTPS/TLS? prompt, we strongly recommend HTTPS. Enter N to skip it for now (if your certificate and private key are not ready, or you use a PFX-formatted certificate, you can set up HTTPS later from the Configuration guides). Enter Y to secure traffic now with a certificate and private key, then answer:
| Prompt | Default | What to enter |
|---|---|---|
| HTTPS Port | 443 | The secure port you want, or press ENTER for 443. |
| Path to the TLS key file | none | The full path and filename of the server's TLS key file. It can be named anything; it does not have to be informer-key.pem. |
| Path to the TLS certificate file | none | The full path and filename of the server's TLS certificate file. It can be named anything; it does not have to be informer-cert.pem. |
Load balancing
At the Set up role-based load-balancing? prompt: to use HTTPS you must use either the Informer Load Balancer or another load-balancing application, and the Load Balancer is strongly recommended for performance even without HTTPS. It distributes requests across Informer's core components. New installs default this to Yes, and in most cases you should keep the defaults:
| Prompt | Default | What to enter |
|---|---|---|
| Query Threads | 2 | Threads handling query requests. |
| Query Threads Port | 3002 | Port used by the query threads. |
| API Threads | 2 | Threads handling API and UI requests. |
| API Threads Port | 3001 | Port used by the API threads. |
| Load-Balancer Threads | 1 | Threads for the Load Balancer. |
| Separate threads for Schedules | optional | Enter Y to run scheduled Jobs on their own threads; otherwise (the default) Jobs run through the API thread. Recommended if you will schedule many Jobs. |
| Schedule Threads | 2 | Threads for scheduled Jobs. Unless directed otherwise by Entrinsik Support, enter 2. |
| Schedule Threads Port | 3003 | Port used by the schedule threads. |
The Schedule Threads and Schedule Threads Port prompts appear only if you enable separate threads for Schedules.
First start and sign-in
Informer installs the application and then attempts to start for the first time. This can take several minutes and should not be interrupted unless an Entrinsik Support team member directs you to. Once the first start succeeds, the Informer Windows service is installed and started automatically. If you hit issues, stopping and restarting the Windows service is the first thing to try.
You can now open Informer in a browser. The default URL is http://localhost. The default credentials are:
- Username:
admin - Password:
123
We strongly recommend changing this password right after your first sign-in. Open the menu at the top right for the System Administrator user and choose Change your password. See Passwords and MFA.
Post-installation: Elasticsearch memory
New Windows deployments come with Elasticsearch 8, which by default uses 50% of server memory on initial installation. For a deployment on the minimum hardware, the suggested Elasticsearch allocation is 4 GB. After installing, set the Elasticsearch memory allocation; the Increasing Informer Memory Allocation guide in the Configuration section covers how.